Settings
The settings control how portions of the application work.
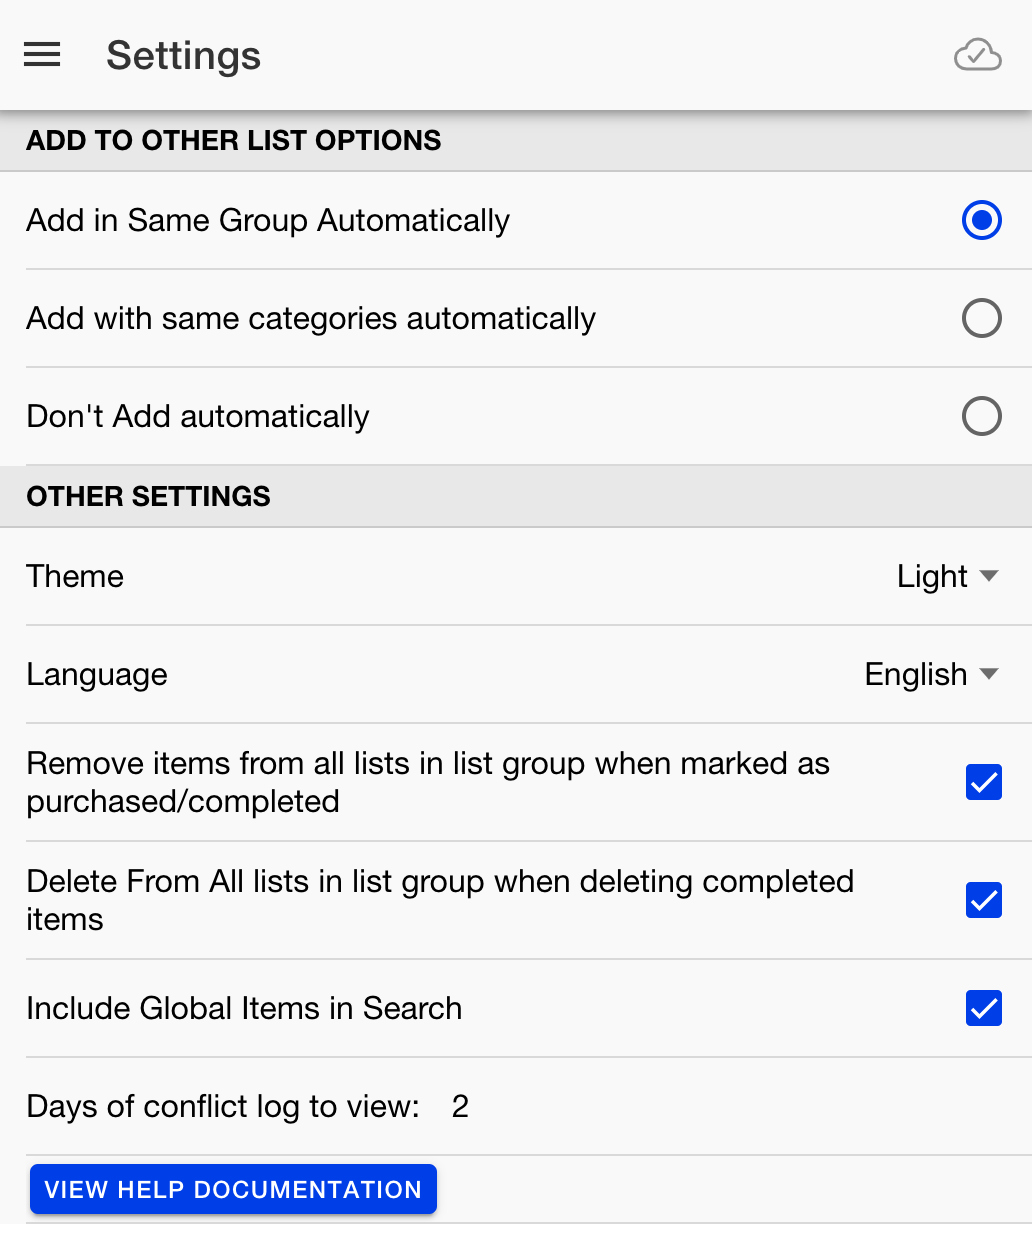
There are 3 different options that are centered around how items are added to lists with relation to other lists in the same list group (Add To Other List Options):
- Add in Same Group automatically -- When selected, if you have Wegman's and Publix in your Grocery Store list group, and you add Apples to the Wegman's list, they will automatically be added to the Publix list as well. The only exception to this would be if the item wasn't stocked at the the other stores on the list (as shown on the item editor screen). This is the default setting. This is also the automatic behavior when you have selected the list group level ("Grocery Stores") on the Item List entry/ check off screen.
- Add with same categories automatically -- This is similar to the first, but it will only add to the other lists if that store has the same category of items. For instance, if you say that Publix doesn't have an Alcohol section but Wegman's does, if you add beer on to the Wegman's list, it will not automatically be entered on the Publix list.
- Do not add automatically -- Items are only added to the selected list. If a list group is selected, it will still automatically add it to all stores in the list group.
Other Settings:
- Theme - The application can either use the default system theme, or be forced to dark or light mode here.
- Language -- The application has translations provided for the application screens and provided global items, categories, and units of measure. English, Spanish, and German are currently available. The language should automatically be detected based on browser and other system settings, but can be over-ridden here as well.
- Remove items from list group when marked as purchased -- If you are shopping on the Wegman's list, and you check off the apples from the list, with this setting turned on it will also automatically check the apples off the Wegman's list as well. This makes it easy if you are going to maybe 2 grocery stores and want to shop for things at either store. This is convenient if you have for instance a store like Sam's Club or Costco and might be able to buy several things from your grocery list, but still need to go to the Wegman's to pick up your remaining items.
- Delete from all lists in group when deleting completed items -- When you press the "delete completed items" button, this will remove the items from all other stores in the list group as well. This is convenient in the above scenario as well as you don't need to delete the completed items off of multiple stores in the list group.
- Include Global Items in Search -- for some use cases, the provided global set of items might not be useful, so you can exclude these items from search if desired.
- Days of Conflict Log to view -- in the rare event of a conflict, you will see a triangle warning indicator in the upper right hand corner of the screen next to the cloud/sync indicator. If you click this icon or choose "Conflict Log" from the menu item, you will only be shown conflicts from the selected number of days in the past. If conflicts do occur you can view them in the conflict log and see which was the "winning" and "losing" document, so you can make additional changes or coordinate with family members as required. Once you have viewed the conflict log, you can also "Set as Viewed" on the conflict log screen so you will not see those items again.